Friday, January 11, 2013

::PROJECT FLASH::

Salam and Hi~ 
Now, cerita pasal Projek Flash pulak~ :)
untuk project Flash kami telah membuat satu courseware untuk kanak2 belajar mengenai numbers...
Dimana di dalam courseware ini terdapat lagu, latihan yang sangat menarik~ :)
Untuk membuat projek ini, kami telah menggunakan segala ilmu yang di ajar oleh Dr. Zaida sepanjang sem ini.. :)

Di bawah ini adalah main menu untuk courseware kami~ :) terdapat tiga button iaitu about, exercises and numbers~ Untuk main menu ini, saya telah terangkan secara detail bagaimana untuk membuatnya~ :)
boleh refer sini untuk cara-cara MAIN MENU
Button more itu pula akan show extra info apabila di click~ :)

Selepas user menekan button number, user akan navigate ke scene yang laen~ 
iaitu scene number...
Di dalam scene ini terdapat button untuk lagu di mainkan~ :)
User juga boleh menekan button home jika mahu kembali ke main menu~ :)


Di bawah ini adalah scene semasa video telah dimainkan~ :)


Apabila user click pada button exercise pula, user kan berpeluang melakukan tiga exercise iaitu text entry, drag and drop dan multiple choices questions...


 1. TEXT ENTRY
untuk text entry ini sila rujuk di SINI  untuk stepsnya~


Jika di lihat pada gambar di bawah ini, user telah memasukkan jawapan yang betul..
dan Dynamic text akan muncul dan memaparkan jawapan "correct" menunjukkan jawapan di taip user adalah betull..


Apa akan jadi jika user menaip jawapan yang salah?
dynamic text yang lain akan di paparkan seperti dalam scene di bawah ini..


2. MULTIPLE CHOICES
untuk multiiple choicesila rujuk di SINI  untuk stepsnya~

Di bawah adalah contoh, apabila user memilih A iaitu jawapan yang betul untuk soalan ini..
Dynamic Text yang menunjukkan jawapan nya betul akan dipaparkan...


Jika user memasukkan jawapan yang salah pula, 
dynamic text yang menunjukkan jawapannya saalah akan di paparkan seperti di bawah ~ :)
Jika user ingin kembali ke scene sebelumnya, user boleh click button back yang disediakan~


3. DRAG AND DROP
untuk drag and drop ini sila rujuk di SINI  untuk stepsnya~

Untuk drag and drop ini user perlu drag ejaan yang betul bagi setiap soalan..Jika jawapan yang di jawab adalah btul tanda tick seperti gambar berikut di bawah ini akan dipaparkan~ :)
Jika tidak, ia akan kembali ke tempat asal~ 


TADAA~ macam ni la tick yang dimaksudkan apabila user berjaya drag n drop ke jawapan yang betul~ :)
Sama seperti exercise sebelumnya, jika user ingin kembali ke scene sebelumnya, user boleh click button back yang disediakan~


THE END ^.^

Thursday, January 10, 2013

::PROJECT DREAMWEAVER::


Salam and Hi.. 
harini saya nak cerita tentang projek 1 saya dgn dua kawan saya untuk dreamweaver dimana kami telah create satu website untuk kedai kek online..
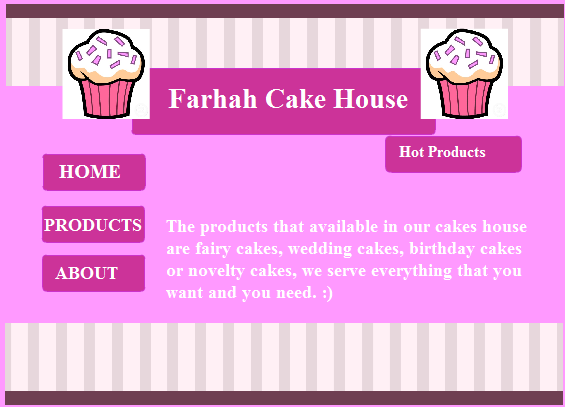
Kedai kek online kami ini menyediakan khidmat untuk tempahan kek secara online.. di bawah ini adalah homepage untuk kedai kek kami..


Terdapat DUA USER untuk website ini iaitu CUSTOMER dan ADMIN.. untuk customer terdapat  customer yang biasa dan registered customer.. homepage ini boleh dilihat oleh semua user...


1. CUSTOMER 

Saya mulakan dengan customer terlebih dahulu ya~
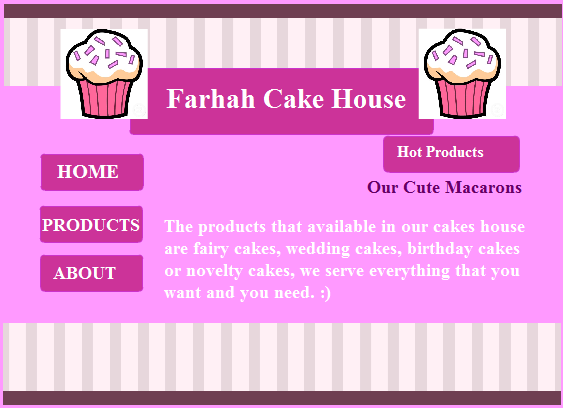
Bagi customer yang belum mendaftar, mereka perlu mendaftar untuk membolehkan mereka melihat page-page lain untuk kedai kek online kami..
Dalam homepage ini terdapat button untuk user click untuk ke page sign up..

Di bawah ini adalah page sign up yang kami maksudkan~ User perlu mengisi details seperti email.. username.. dan password..


Setelah customer berjaya mendaftar mereka akan dibawa ke page di bawah ini~ iaitu page yang membolehkan mereka sign in untuk melihat page2 lain di website kami~


Jika customer tidak berjaya untuk mendaftar disebabkan mereka telah memilih customer username yang telah digunakan oleh customer lain.. page di bwah ini akan muncul... hal ini kerana kami telah menggunakan check new username untuk membolehkan website kami ini menyemak username yang dimasukkan oleh customer available atau tidak.. :)


2. REGISTERED CUSTOMER

Seterusnya, apabila customer yang sudah mendaftar berjaya untuk sign in di page kami.. mereka akan dapat melihat home page baru yang mempunyai tab seperti our product, about us, services, recipes, order form dan contact us... untuk page our product seperti di bawah ini.. customer boleh melihat product yang ada di kedai kami seperti donut, tart, desert dan lain2 lagi~

contohnya, apabila customer click salah satu product ini, mereka akan dapat melihat jenis2 product yang di click oleh mereka...contohnya seperti dibawah..
Apabila customer click doughnut.. mereka akan ke page di bawah ini..
Setiap jenis kek mempunyai code yang berbeza bagi memudahkan proses untuk order nanti...


Untuk tab seterusnya iaitu about us pula mempunyai alamat untuk dihubungi, terms and conditions yang ditetapkan oleh kedai kami dan sedikit description mengenai kedai kek online kami ini~


Manakala untuk tab seterusnya iaitu services, di sini di muatkan service2 lain yang ditawarkan di kedai kami, contohnya seperti kelas masakan, ataupun tempahan2 yang banyak untuk sebarang majlis~ :)


Seterusnya, tab yang ketiga iaitu tab recipes, disini kami menyediakan resepi2 kek terkini untuk customer2 yang berdaftar.. video juga dimuatkan untuk mudahkan customer kami lebih faham cara untuk membuat setiap masakan dari resepi yang kami sediakan~ :D


Di bawah ini pula adalah order form untuk membolehkan customer mengorder...
Antara details yang perlu di masukkan oleh customer ialah nama., contact number, address, type of products, product code dan quantity... untuk type of product kami sediakan drop down list untuk memudahkan customer untuk pilih kek yang ingin di order.. Untuk product code, customer perlu merujuk di page our product yang telah kami sediakan.. untuk setiap data ini, akan dimasukkan ke dalam database...
server behavior yang digunakan ialah inser record~
selain itu, kami turut menggunakan restrict access to page untuk mengelak dari user yang tidak mendaftar mengakses website kami~ :)


Next, page contact us.. page ini adalah bertujuan untuk membolehkan user berhubung dengan pihak admin secara email.. segala pertanyaan akan di jawab dab di balas menggunakan email~ :)


3. ADMIN

Untuk ADMIN pula, admin akan log in masuk seperti user lain... Bezanya ialah tab-tab yang dapat dilihat adalah lebih meluas dari tab customer..
Jika dapat dilihat di bawah ini, selain daripada tab2 yang boleh dilihat pada registered customer, tab2 lain seperti view user(customer), edit user (customer) insert user(customer), view order, view order and delete order. Semua tab yang sama untuk registered user(customer) adalah mempunyai function yang sama untuk admin~


Di bawah ini adalah interfaces untuk page view user.. Di mana semua user yang mendaftar akan dapat dilihat oleh admin.. Recordset behavior adalah salah satu server behavior yang digunakan selain dari restrict access to page~ :)


Manakala, ini pula adalah page untuk admin edit butiran mengenai user.. apabila admin click edit (link edit di setiap hujung nama) admin akan dibawa ke page untuk edit details user itu...

Tada~ here the page.. :) di sini admin boleh edit mana2 field yang admin mahu~ dan segalanya akan di update once button update di click.. update data behavior digunakan untuk tujuan ini~ :)


Di bawah ini pulak page untuk admin delete user... :) delete user behavior digunakan untuk page ini...
Apabila details berjaya di delete.. admin akan dapat melihat list of user yang telah diupdate~


Untuk tab setereusnya iaitu tab view order, admin dapat melihat order2 yang di buat oleh customer~
Order list ini adalah order list yang menunjukkan order yang belom selesai.. Hal ini kerana, admin akan delete order yang telah selesai dan data tersebut tidak akan ada dalam list di bawah ini~ :)

Ini adalah page untuk admin update data untuk order-order oleh customer~ :)
again, pakai update data server behavior~ :)


Bawah ni pula page untuk delete order.. page ini penting untuk admin kerana jika admin tidak delete order yang telah selsai, ini akan mengelirukan admin pada masa akan datang~ :)


Dan yang terakhir button sign out terdapat pada semua page, dimana log out user server behavior digunakan~ :) Apabila user telah log out.. Mereka tidak lagi dapat view pages untuk registered user~ 
:)

Thanks to my team member for this gud job~ :D


::LAST WEEK:: Drag and Drop


Salam and hi.. :D
Minggu ni adalah minggu last untuk kuliah..
Untuk authoring system ni, bfore habis kelas kami telah belajar mengenai drag n drop..
Kalau sebelum ni belajar simple ttg drag n drop tp this time blajar advance sikit…
Yang mana aka nada tanda betul jika kita Berjaya drag n drop di tmpat yang betul…
Here the steps~

1.       We have to insert a new symbol and name it as place…
2.       Make sure you choose movie clip as the type of object..
3.       Then make a rectangle at the first frame…
4.       Put this action script on the frame..
Stop();
5.       Insert new key frame at frame 2.. and draw a tick at the corner of the rectangle…
6.       Put the stop action script also on the frame..
7.       Then, back to the scene and drag the place movie clip that we create on the stage…
8.       Insert two new symbols which are rectangle and circle..
9.       Rename them as rec and circle..Again choose movie clip as the type of the symbol..
10.   Then right click on the symbol and insert these below action script for the rectangle..

on(press){
startDrag(this);
}
on(release){
stopDrag();
if((this._x>=378.4)&(this._x<=427.8)&(this._y>=195.2)&(this._y<=234.6))
{
_root.box2.gotoAndStop (2);
}else{
_root.box2.gotoAndStop (1);
this._x=93.5;
this._y=117.6;
}
}

111.  And this below action script for circle..

on(press){
startDrag(this);
}
on(release){
stopDrag();
if((this._x>=398.1)&(this._x<=442.8)&(this._y>=281.8)&(this._y<=289.3))
{
_root.box1.gotoAndStop (2);
}else{
_root.box1.gotoAndStop (1);
this._x=112.2;
this._y=179.6;
}
}
12.   Test Movie..

Ini adalah drag n drop yang baru saya create untuk project flash saya~ :D


Monday, December 17, 2012

::WEEKS 14:: APPS 4 Types of interaction


Salam and Hi ~
Minggu ini, dalam kelas kami diberi tugasan untuk membuat 4 activities dalam kelas...

Activity 1: Develop a motion tween animation of pendulum~


Activity 2: Upload a morphing animation of butterfly life cycle .. start from larva to butterfly..

Activity 3: Implementing frame-by-frame skill, sketch a cartoon and animate it..

Activity 4: Animate the process of pollination agent..

Selain task-task ini kami juga diberi tugasan lain~ di mana kami perlu explore apps 4 ini dan lakukan beberapa activities untuk setipa interaction seperti di bawah~

 Terdapat empat jenis interaction iaitu 

1. Creating Main Menu
Creating main menu buttons is essential for interactive website to navigate from one page to another.

2. Multiple Choice Questions
This type of applications allow students to get interactive feedbacks from the content. Users could also could create flash-based quizzes with multimedia elements, such as images, sounds, narrations, movies and so on.

3. Text Entry Questions
Allow users to develop quizzes and allow interactive communication between the user and the content. 

4. Drag and Drop
It is another applications that users could build in flash to make learning activities more fun and interesting.


Ini adalah soalan untuk aktiviti 4..


1. Create a multiple choice questions that will provide a correct or incorrect response upon your answer.
2. Create one application that allows users to type an input of question provided.
3. Create a Main Menu that contain following actions:
  •  A button that navigate from one page to another.
  •  A button that navigate from one scene to particular frame of different scene
  •  A button that navigate users to other webpage

4. Based on your own creativity, create a simple flash application that involves drag and drop function.


Untuk lihat semua aktiviti ni yang telah saya buat, sila lawat ke site ini~ :)


Here the steps untuk setiap aktiviti~ :)


TASK 1. Create a multiple choice questions that will provide a correct or incorrect response upon your answer.


1. For the first layer, rename it as background and create the background, text for the stage.
2. Insert a new layer and rename it as question.
3. Then, choose the text tool and choose the static text at the properties panel and start typing the questions.
4. Create an oval button and changes the colour and resizes~
5. Using text tool type A on the button.
6. Convert the button to symbol (button type).
7. Repeat the same steps to create B,C and D buttons.
8. Insert new layer and rename as respon..
9. Then, choose text tool and choose the dynamic text in the properties panel.
10. Rename the variable as respon.
11. Insert another layer and rename as Action.
12. Put the action script (right click>action)
            stop();
            var respon;
            respon = " "
13. For the right answer which is A put this action script on the button~
on (release) {
            respon = "Congrats, your answer is correct";
            }
14. For the wrong answer which is B,C,D put this action script on the button
on (release) {
            respon = "Congrates, Your answer is correct!";
           }
15. Test Movie (Ctrl+Enter)


TADAAA~ 

This is the example when I click A which is the right answer~


This is the example when I Click the wrong answer~


TASK 2 Create one application that allows users to type an input of question provided.

1. For Layer 1, create the background using multiple colors of rectangles and type the text for the topic. (choose the static text in properties panel)
2. Insert a layer and rename the layer as question and start type the questions. (Choose the static text in properties panel)
3. Then, create rectangle below the question and insert a text in it using text tool. For this text,
5. After that, choose text tool again and this time choose dynamic text.
6. Insert a new layer and rename it as button.
7. Drag the play button from the library.
8. Insert a new layer name as stop.
9. Right Click on keyframe and choose actions. Type the actionscript below.
stp();
var answer;
var respon;
answer=""
respon=""o
10. Then, select the button and right click and insert actionscript as below..

 on(release) {if (answer == "print client") { respon= "Correct!";}
                                
          else {
         respon = "Incorrect, Your answer "+answer+"is wrong";
                   }
                 }

on(release, keyPress "<Enter>") {if (answer == "print client") { respon="Correct!";}             
                                
         else {
         respon = "Incorrect, Your answer "+answer+"is wrong";
                   }
                   }
11. Input textfield name as answer and dynamic textfield as respon on the variables at properties panel.
12. Test Movie (Ctrl+Enter)


And here the RESULTS~

When type the correct answer it will show "Correct"


When type the wrong answer it will show as below..


TASK 3 Create a Main Menu that contain following actions:
  • A button that navigate from one page to another.
  • A button that navigate from one scene to particular frame of different scene
  • A button that navigate users to other webpage.

1. First, design the background on layer 1 and rename it to background.
2. For the button HOME, PRODUCTS and ABOUT, type the name in the instance name as example HOME as home and so on.
3. Create the other scene that the same as Scene 1 by click Windows>Other panels>Scene and scene windows will appear. Click duplicate symbol to copy a new scene.Rename the scene as Scene 2.
4. Type anything in both scenes to differentiate between the scene.
5. Test the movie and we will see the page is like blinking. This happened because it's nonstop.
6. So, we have to insert action script on button layer to make it stop.
stop();
7. Test again and the page is not blinking anymore.
8. Then, insert key frame for all the layers in both scenes (eg. frame 20).
9. In Scene 2, create new layer name as "product" and productpage.
10. Create other layer to stop command in the actionscript.
11. To make the product button works, each time user click it. Right click on the product button and insert this below actionscript.
on(release) {
    gotoAndPlay("Scene 2",1);
                  )
12. While for the home button,  Right click on the home button and insert this below actionscript..

on(release) {
    gotoAndPlay("Scene 1",1);
                  )
13. Test movie. Then, when click the home or product button, it will navigate to the specified page.
14. To navigate to the different frame but the same scene. As example, in my task I put a hot product button. So, when click the button the info about the product will appear at the same scene. Insert frame in between the keyframe as example frame 10 on the product layer. Name it as hotproduct.
15. Insert button for the HOT PRODUCT in scene 2..
16. Then use text tool to create a dynamic text for the information of the hot product.
17. Type this below actionscript to make the button works..
on(release) {
    gotoAndPlay("Scene 2","hotproduct");
                  )

18. For the about button, it's funtion to link to the webpage..So, type this below actionscript..

on(release) {
    getURL("http://cakeshouse.com/");
                  )
19.Test Movie (Ctrl+Enter)


The HOME page~


The PRODUCT page before click the hot product button~


PRODUCT page where the info of the hot product appear~


TASK 4 Based on your own creativity, create a simple flash application that involves drag and drop function.

1. First, import a picture as background and rename the layer as background.
2. Insert text using text tool which will ask the user to drag and drop the puzzle at the right place.
3. Insert picture and use rectangle to make the border.
4. Then drag the picture out of the border.
5. To make the picture separated, so it can become pieces of puzzle, breakapart the picture and use free transform tool to separate it.
6. Then, convert the rectangle to symbol as movie clip.
7. Next, right click on the piece of puzzle and insert this below actionscript.
on(press) {
startDrag(this,true);
}

on(release){
stopDrag();
}
8. Test Movie (Ctrl+Enter)

Before drag the pieces of puzzle~

Complete puzzle~ :)


Monday, December 10, 2012

::WEEK 13:: ANIMATION

Salam and Hi.. 
Untuk minggu ni~ Belajar mengenai apps 3 iaitu animation...
Animation ade 4 jenis iaitu..
1. Motion Tweening - allows object to change position.
2. Shape Tweeining - can change shape object to object, text to object and image to image.
3. Motion Guide - allows users to move an object on predefined path, such as in circles or curve.
4. Frame by frame - similar with traditional cel-styles in animating a cartoon by drawing different movement in each frame.

Kami diberi satu tugasan.. yanguntuk setiap animation ni..
dan ini hasilnye~ selepas upload di u tube~ hehe


1. Bouncing Ball- motion tweening (TASK 1)


1. Draw Circle (A ball)
2. Then convert the symbol (circle) to graphic.
3. Insert Key Frame (eg. at keyframe no.25)
4. Right Click between the Key Frame and Create Motion Tween
5. Move the ball to the position we want for certain key frame.
6. We also can change brightness and the size of the ball..
7. Create Motion Tween
8. Test Movie
9. Save (Export Movie)

*You can create the environment on the other layer~ :)


2. FLASH word to Shape (star) - Shape Tweening TASK 2

1. Create Text (change font,size, style)
2. Remove Outline
3. Break Apart (Repeat Again)
4. Insert Key Frame (eg. at keyframe no.25)
5. Delete Text
6. Draw Shape
7. Create Shape Tweening
8. Save (Export Movie)

:)


3. Ants- Motion Guide TASK 3


1. Draw the ant.
2. Convert the ant to movie clip.
3. Choose a key frame (eg. keyframe no.50)
4. Place the and at the new position at keyframe 50.
5. Right click between the keyframe and create motion tween.
6. Rename the layer as ant.
7. Create motion guide.
8. Use pencil to draw the guide
9. Select first key frame and click the ant at the cente and move it at the starting point of the guide.
10. For the last key frame, move it at the last point of the guide.
11. Use transform tool to adjust the position for certain keyframe,
12. Tick the orient to path at the first key frame.
13. Test movie.
14. Save (Export Movie)


4.  Bear- Frame by frame - TASK 4

 1. Design the cartoon (same cartoon) with different expression..
2. Save every image in the library by convert it to symbol.
3. Put the first image in keyframe 1..
4. For next keyframe which are keyframe 2 and so on, insert another image.
5. Test movie
6. Save (export movie)


Powered by Blogger.